I mean plenty of cups of tea.
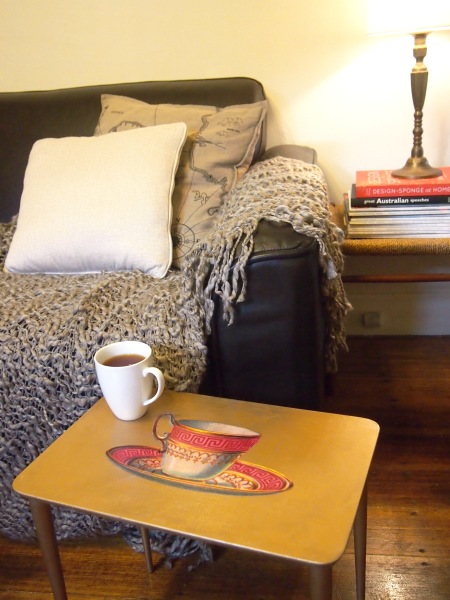
And what do you need when you have two couches, two bodies and only one coffee table? You need a little side table to hold said tea when the best couch real estate is taken. In our house, there are two competing properties on the couch market. Couch number one is our ‘original’ couch, located in a warm western corner of the lounge, this cosy (read: smaller) couch has excellent coffee table frontage with local reading lamp access and sweeping views of the television. Couch number two is a roomy 3-seater nestled between two bustling walk-ways (read: high traffic area) – a minimalist’s delight!
If you can decipher real estate talk then you can guess that couch number one is the cosy household favourite with the coffee table right in front and couch number two is a big lonely-feeling couch with nowhere to put a cup! Due to the freezing weather, and therefore extra couch time we’ve been having, I had to come up with a cup-friendly solution. On our last trip away Dave took me to Healesville where there seems to be one op-shop for every ten people. Awesome. In one of them I found an old brown laminate table that I think was originally part of a nested set of three. It was $5 and it had to come home with me to become my new tea table.
I had big plans for this table. Big plans of a Moroccan trellis pattern top in turquoise and antique white. I was so enthusiastic I made the entire pattern template from scratch (I don’t have a printer at home) but the whole thing just didn’t work. It happens. Not every project goes the way you want.
Luckily that morning I had picked up a can of gold spray paint and already painted the table legs with it so I scraped of the layers of paint (using my best kitchen pallet knife…whoops) from the table top and sprayed the whole thing gold instead. Then I Mod Podged a gorgeous vintage teacup I found at the Graphics Fairy (fastastic site with free vintage images) on top. I was so ‘done’ by the gold-painting stage that I didn’t sand off the paint from the doomed pattern experiment, I just sprayed right over it, but I actually like the slightly flawed look it gave the finished table top.
Turns out I like the gold teacup version better than the pattern anyway. So there.
Things you will need for this project
A table
Sandpaper
Electric sander (optional)
Primer (I actually just used white spray paint)
Gold spray paint
Printed and cut out image
Mod Podge (I used gloss)
Foam brush
Sealer (TBA)
If possible, remove the legs from the table top – I was lucky, mine just unscrewed. Sand the table top with the electric sander or sandpaper to rough up the surface. Clean with a damp cloth and allow to dry.
Sand the legs if they need it – mine had been attacked by a kitten or small child at some point so I had to sand out the teeth marks. Clean with a damp cloth and allow to dry.
Coat top and legs with one layer of primer or white spray paint and allow to dry. Coat with two coats of gold spray paint, allowing each layer to dry before the next.
Decide on the position of your picture and glue to table top using Mod Podge. Smooth out any air bubbles and then apply a layer of Mod Podge to the whole table top and allow to dry. Coat with two more coats of Mod Podge, allowing each layer to dry before the next.
Now, the only thing I haven’t done yet is coat the whole thing with some kind of sealer. I didn’t think this was necessary until a damp hot cup of tea seemed to stick a bit to the table. I’m using coasters until I go to the hardware shop and find the right sealer for the job – stay tuned!


